From Locked In to Plugged In: My Escape to a DIY Smart Home Wonderland
For a long time now, I have wanted to start my own blog to share experiences, tips and tricks, ideas, and everything that comes to my mind – but mostly related to technical topics.
So here we are, my first blog post, and I can't imagine a better topic than this... Why? Because I postponed my smart home migration as long as I postponed starting my blog. It's been a while, trust me...
Components
First of all, a list of all smart home related components, which I use in my setup currently (12/2024). Side note: I want to replace all of the WIFI WiZ components with Zigbee IKEA bulbs for a better Zigbee mesh and because of connection and delay issues. The good part is: you can use almost every Zigbee device with this setup. Check out the list of supported devices.
- Raspberry Pi 4 Model B
- 32 GB MicroSD Card
- SONOFF Zigbee ZBDongle-E (ERF32MG21)
- No-name USB 2.0 extension cable
- Philips Hue
- Dimmer switch v1 (324131092621)
- Dimmer switch v2 (929002398602)
- Play Lightbar (915005733701)
- Lightstrip Plus (915005106701)
- Bulbs (9290022166, 8718699673147)
- WiZ Connected
- RGB Bulbs
- Smart Plug
- Lightstrip
- Ikea
- Smart Plug TRETAKT (805.403.49)
- ℹ️ Newer model with power measurement: INSPELNING (005.698.36)
- Dimmer switch RODRET (205.281.28)
- Bulbs TRÅDFRI
- Smart Plug TRETAKT (805.403.49)
Firmware Flash ZBDongle-E
During my research for a good, reliable Zigbee dongle, I stumbled across the SONOFF ZBDongle-E, which is based on the newer EFR32MG21 chip. It is a bit smaller compared to the previous version, named ZBDongle-P, which is based on the CC2652P chip. The E-version supports the new Ember adapter, which I recommend using. A firmware update is recommended for this, and may even be absolutely necessary.
With the Silabs Firmware Flasher website the dongle can be easily flashed with just a browser. Follow the instructions on the website (e.g. driver installation).
⚠️ Use firmware 7.4.4 or higher! I initially tried the official latest iTead 7.4.3 firmware that SONOFF recommended, but my adapter kept crashing and Zigbee2MQTT was restarting almost every time I sent a command. After spending hours troubleshooting my entire setup, I figured out that the problem was the firmware. Once I updated my ZBDongle with the firmware from the flasher website, it started working perfectly without any crashes!
Docker Compose
My Home Assistant is based on a self-managed Docker Compose setup. I didn't choose the HA-OS because I use the Raspberry Pi for more than Home Assistant, and I don't want a managed OS at this point. For me, it's the best way to combine Home Assistant with my own deployment automation and backup environment (btw, that's a good topic for one of my next posts). If you want to keep things simple and easy to maintain, especially for beginners, I would recommend using the HA-OS. The Home Assistant documentation provides enough information for several setup methods.
If you're interested in the same way I've chosen, I'll now give you some information about the Docker deployment. The main components are Home Assistant, Eclipse Mosquitto (MQTT) and Zigbee2MQTT. For easier configuration edit I've added a VSCode container with the config-volume mounted.
💡 Just combine the following code snippets into a single Docker Compose file, check for newer image versions, update your device path and VS Code password, and you should be good to go!
Home Assistant
The first service in the configuration is, of course, Home Assistant. The ha:/config volume stores all of Home Assistant’s configuration files, while /etc/localtime:/etc/localtime:ro synchronizes the container’s time with the host system. Additionally, /run/dbus:/run/dbus:ro allows Home Assistant to interact with system services like Bluetooth or other D-Bus integrations.
Because Home Assistant often requires access to hardware devices, I enabled privileged: true, which grants the container additional permissions. I configured network_mode: host, which puts the container directly on the host’s network. This setup simplifies device discovery and reduces communication latency, which is critical for a responsive smart home system.
services:
  ha:
    image: ghcr.io/home-assistant/home-assistant:2024.12.5
    restart: unless-stopped
    environment:
      TZ: "Europe/Berlin"
    volumes:
      - ha:/config
      - /etc/localtime:/etc/localtime:ro
      - /run/dbus:/run/dbus:ro
    privileged: true
    network_mode: host
Eclipse Mosquitto (MQTT)
The next service, MQTT, runs Eclipse Mosquitto, a lightweight MQTT broker that acts as a messaging bridge between IoT devices (in my case the Zigbee dongle) and Home Assistant. It handles the MQTT messages, enabling devices to publish their data (like a temperature reading) or subscribe to control commands (like turning a light on or off).
I start the container with the command mosquitto -c /mosquitto-no-auth.conf to run the broker with a preserved configuration file that disables authentication. While this might be acceptable for a local network, it’s crucial to avoid this setup in public-facing environments for security reasons. The service exposes two ports: 1883 for standard MQTT communication, and 9001 for the WebSocket interface, which is helpful for debugging and advanced use cases.
  mqtt:
    image: eclipse-mosquitto:2.0.20
    restart: unless-stopped
    command: "mosquitto -c /mosquitto-no-auth.conf"
    environment:
      TZ: "Europe/Berlin"
    ports:
      - 1883:1883
      - 9001:9001
    volumes:
      - mqtt:/mosquitto
    networks:
      - homeassistant
Zigbee2MQTT
For managing Zigbee devices, I included the Zigbee2MQTT service in the setup. Zigbee2MQTT is an open-source bridge that allows Zigbee devices to communicate with Home Assistant. It acts as a translator, converting Zigbee signals from the connected USB dongle into MQTT messages that are sent to the MQTT broker service. Zigbee2MQTT and Mosquitto work together seamlessly: Zigbee2MQTT manages the hardware and device-specific protocols, while Mosquitto facilitates efficient message routing between Zigbee devices and Home Assistant.
❗️ The most important part of this service is the devices section, where I mapped my Zigbee USB dongle from the host to the container. The exact device path, /dev/serial/by-id/name-of-your-dongle, should be replaced with the specific path for your dongle. To get the exact path of the dongle, just run the following command: ls -al /dev/serial/by-id/
  zigbee2mqtt:
    image: ghcr.io/koenkk/zigbee2mqtt:1.42.0
    restart: unless-stopped
    environment:
      TZ: "Europe/Berlin"
    ports:
      - 8080:8080
    volumes:
      - zigbee2mqtt:/app/data
      - /run/udev:/run/udev:ro
    devices:
      - /dev/serial/by-id/name-of-your-dongle:/dev/ttyACM0
    networks:
      - homeassistant
VSCode
To make editing Home Assistant’s configuration easier, I included a VS Code server as part of the setup. This service provides a web-based VS Code editor that I can access from any browser.
I configured two volumes for this service: ha:/config to edit Home Assistant’s configuration files directly and vscode:/home/coder to store the VS Code server’s data.
To simplify permissions, I configured the container to run as root. While this approach works for a local environment, it might not be the best practice for production setups where security is a higher concern. Finally, I set a password in the environment section to secure access to the editor. For demonstration purposes, I used change#me!, but this should be replaced with a strong password.
  vscode:
    image: ghcr.io/coder/code-server:4.95.3
    restart: unless-stopped
    ports:
      - "8443:8080"
    volumes:
      - ha:/config
      - vscode:/home/coder
    user: root
    environment:
      PASSWORD: change#me!
Volumes and Network
At the bottom of the file, the volumes section defines all the persistent storage used by the services. These volumes ensure that configurations, logs, and other data are preserved across restarts. The networks section defines a custom network named homeassistant, which isolates the services and allows them to communicate seamlessly without being exposed to the host’s primary network.
volumes:
  ha:
  zigbee2mqtt:
  mqtt:
  vscode:

networks:
  homeassistant:
Navigation
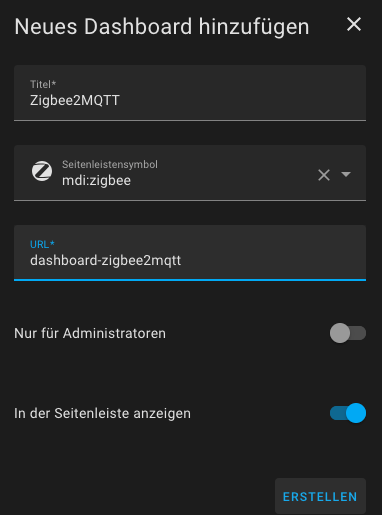
One advantage of this setup is having standalone services that work independently of each other. Nevertheless, I want to control everything through the Home Assistant web interface. The easiest way to achieve this is by adding the other services as navigation items. In Home Assistant, you can add them in Settings -> Dashboards -> Add Dashboard -> Website. Do this steps for Zigbee2MQTT and VSCode service.

Zigbee2MQTT settings
Check if the following settings are configured correctly. With these settings, the Home Assistant integration for Zigbee2MQTT is enabled, as well as the web frontend. The MQTT settings must match the name of the MQTT Docker service. In the serial section, the adapter is set to the new Ember and also the path where the dongle is mounted. Why the Zigbee channel is set to 25, I'll explain next.
All of these settings can also be set through the web interface of Zigbee2MQTT.
homeassistant: true
frontend: true
mqtt:
  base_topic: zigbee2mqtt
  server: mqtt://mqtt
serial:
  port: /dev/ttyACM0
  adapter: ember
advanced:
  channel: 25
...
There is an excellent article by MetaGeek explaining why changing the Zigbee channel to a higher one is important for a stable connection. Because Wi-Fi and Zigbee both operate at 2.4GHz, you can easily avoid interference between them by setting a fitting Wi-Fi and Zigbee channel combination. In my case Wi-Fi is set to channel 1 and Zigbee to channel 25 - works perfect!
MQTT Integration
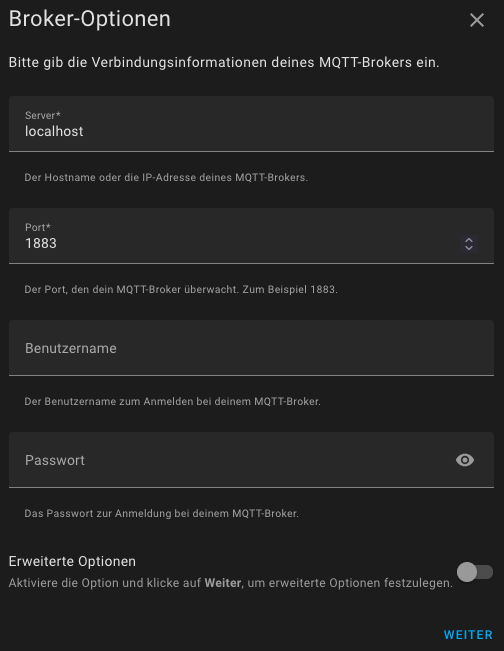
Last but not least - add the MQTT integration to Home Assistant. Simply go to Settings -> Devices & Services -> Add Integration -> Search for "MQTT". Maybe it's already discovered and suggested by Home Assistant, so you don’t have to search for it. Just set the server to "localhost" and the port to "1883". If you didn’t change the command of the Docker service, MQTT is started without authentication, so you can leave the username and password empty. Otherwise, you have to set them both, obviously... Now if you pair and add devices in Zigbee2MQTT, they should show up in your Home Assistant!
I hope this blog post is a good start for all who want to get rid of vendor locks and combine devices from multiple brands into one platform. Besides that, Home Assistant has a great and supportive community on GitHub, the official forum, and several other places across the internet. Maybe I will share some other stuff about my journey with Home Assistant next time. Thanks for reading!